Adding Algolia search to a Gatsby.js static website
Algolia is a product by Algolia for implementing a super fast in-site search system.
Since it's already used on many websites, you might have noticed their logo in some documentations. Gatsby.js also uses Algolia for its documentation.
I know that Google Custom Search is also handy, but it slows down performance and kills one of Jamstack's strengths. So this time I tried to integrate Algolia into a Gatsby.js website.
Working environment:
- Node.js v20.11.0
- React v18.2.0
- Gatsby.js v5.13.3
- gatsby-plugin-algolia v1.0.3
- algoliasearch v4.22.1
- react-instantsearch v7.6.0
Step-by-Step Overview
There are three steps to follow;
- Register with Algolia and prepare settings for your project
- Create data (records) for search and store them on Algolia
- Create a function to display search results on frontend
The condition of this post is "search blog posts written in Markdown". If you use GraphQL queries through any headless CMS, rewrite queries according to your situation.
Registering with Algolia
First you need to register with Algolia and create a new project.
Name your new index data in the project. Algolia recommends that the index name starts with the prefixes dev_, test_ and prod_ according to the production stages.
©Algolia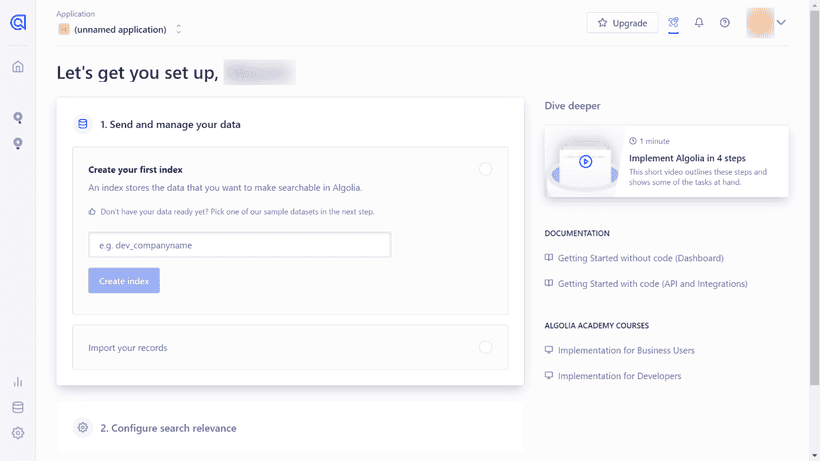
Once you have named the index, do not proceed to "2. Configure search relevance", but first go to ⚙️Settings -> API Keys at the bottom left.
©Algolia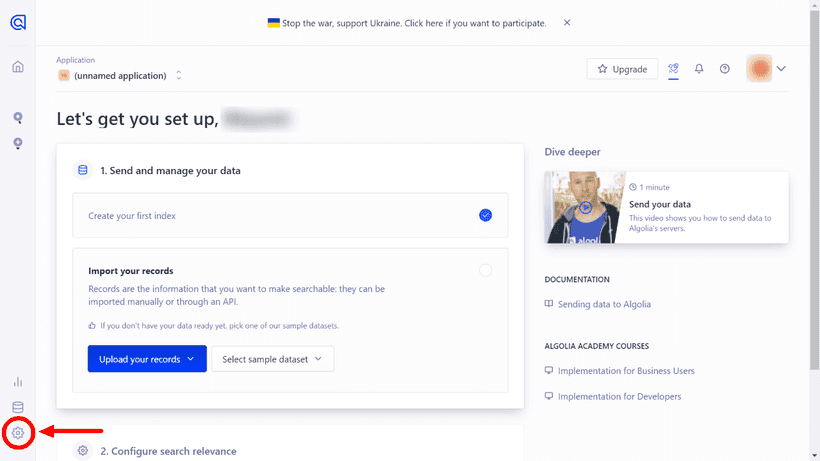
Check the following three API keys on the API Keys page.
- Application ID
- Search-Only API Key
- Admin API Key
©Algolia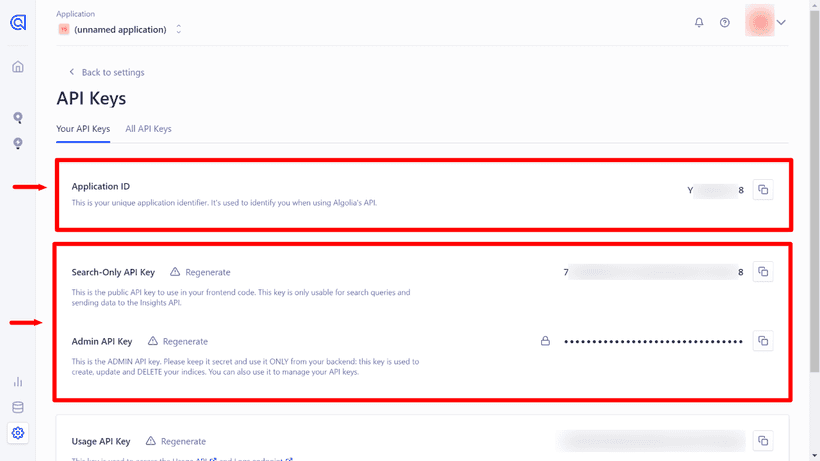
You'll need them later. Leave the display as is.
Installing Algolia plugins into your Gatsby.js project
Next, go to your Gatsby.js project and install a plugin and 2 libraries.
Official Algolia plugin for Gatsby.js
Install the gatsby-plugin-algolia provided by Algolia.
# npm
npm install gatsby-plugin-algolia

# yarn
yarn add gatsby-plugin-algolia
Once the installation is complete, add the plugin information to gatsby-config.js.
require("dotenv").config({
  path: `.env.${process.env.NODE_ENV}`,
})

module.exports = {
  //...
  plugins: [
    //...
    {
      resolve: `gatsby-plugin-algolia`,
      options: {
        appId: process.env.ALGOLIA_APP_ID,
        apiKey: process.env.ALGOLIA_API_KEY,
        indexName: process.env.ALGOLIA_INDEX_NAME,
        queries: [
          {
            query: `{
              // Add query here
            }`,
            transformer: ({ data }) =>
              data.allMarkdownRemark.edges.flatMap(({ node }) => {
                return {
                  // Add objects to register in Algolia by query
                }
              }),
          },
        ],
        chunkSize: 10000,
      },
    },
  ]
}
Then, add APP ID, Admin API Key and index name to .env.production.
ALGOLIA_APP_ID=[Application ID]
ALGOLIA_API_KEY=[Admin API Key]
ALGOLIA_INDEX_NAME=[your_index_name]
Since generating records only works on gatsby build, you don't need to add them to .env.development (We will use ALGOLIA_INDEX_NAME later).
Official Algolia libraries for search results
We'll use react-instantsearch this time (React v16.8.0>). Also install algoliaseach together.
# npm
npm install algoliasearch react-instantsearch

# yarn
yarn add algoliasearch react-instantsearch
Algolia has released several libraries, and react-instantsearch is the latest as of Feb 2023 (important).
Because Algolia's docs contain all their libraries in one place, and different libraries use the same name for components (sometimes working the same, sometimes not), we have to be careful when reading the docs.
When you implant Algolia according to this entry, check if the library name on the right bottom is React InstantSearch v7.
©Algolia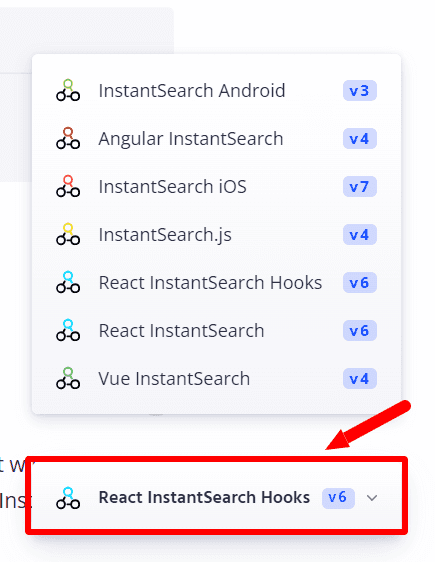
Create and store records for search
To use Algolia on your website, you first need to store records as json data on Algolia. To generate/store records we use gatsby-plugin-algolia.
All we have to do is to add query of data to plugin information in gatsby-config.js.
However, we must consider what data must be stored on Algolia. Too much information consumes cost.
In this example, I added the following data retrieved from Markdown YAML frontmatter.
- title
- slug (used as objectID)
- excerpt
- categories
The query is then set as follows;
module.exports = {
  //...
  plugins: [
    //...
    {
      resolve: `gatsby-plugin-algolia`,
      options: {
        appId: process.env.ALGOLIA_APP_ID,
        apiKey: process.env.ALGOLIA_API_KEY,
        indexName: process.env.ALGOLIA_INDEX_NAME,
        queries: [
          {
            query: `{
              allMarkdownRemark {
                edges {
                  node {
                    frontmatter {
                      title
                      slug
                      description
                      categories
                    }
                  }
                }
              }
            }`,
            transformer: ({ data }) =>
              data.allMarkdownRemark.edges.flatMap(({ node }) => {
                return {
                  objectID: node.frontmatter.slug,
                  excerpt: node.frontmatter.description,
                  title: node.frontmatter.title,
                  categories: node.frontmatter.categories.map(
                    (category) => category.title
                  ),
                }
              }
            ),
          },
        ],
        chunkSize: 10000,
      },
    }
  ]
}
The objectID is used for index management, and Algolia checks the difference based on the objectID.
Though I added slug as objectID, it will waste judging differences if slugs get changed. If slugs can change very often, you should use other data as objectID.
Send records to Algolia on gatsby build
Now you're ready to send records to Algolia.
Run gatsby build on local. Near the end of the build, the records will be sent to Algolia.
gatsby build
...
success index to Algolia - 10.728s - Done!
...
You can see that the records are indexed on your Algolia dashboard.
©Algolia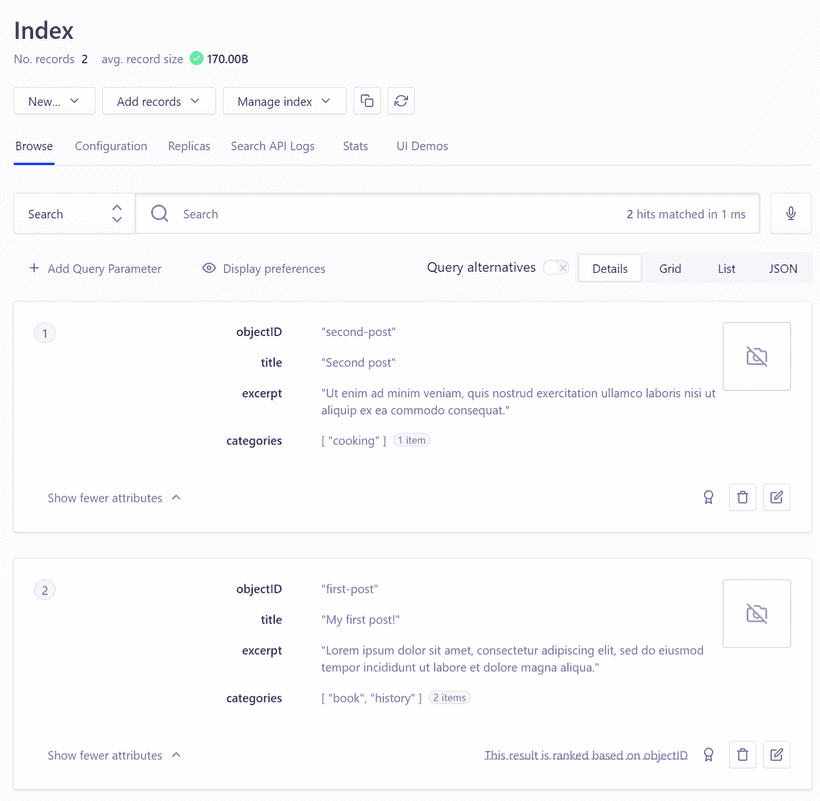
You can also index images by including image:url in the query.
Show the search results
Create a javascript file (called algolia.js here) in your components folder. The following is basic code for displaying the search results.
import React, { useMemo } from "react"
import algoliasearch from "algoliasearch/lite"
import { InstantSearch } from "react-instantsearch"

const Algolia = () => {
  const searchClient = useMemo(
    () =>
      algoliasearch(
        process.env.GATSBY_ALGOLIA_APP_ID,
        process.env.GATSBY_ALGOLIA_SEARCH_KEY
      ),
    []
  )

  return (
    <InstantSearch
      searchClient={searchClient}
      indexName={process.env.ALGOLIA_INDEX_NAME}
    >
      {/* add widget here */}
    </InstantSearch>
  )
}

export default Algolia
The
searchClientvariable is memoized to avoid re-creating the Algolia search client when the Search component is re-rendered. Adding Search with Algolia | Gatsby
Specify environment variables in both .env.development and .env.production.
ALGOLIA_INDEX_NAME=[your_index_name]
GATSBY_ALGOLIA_APP_ID=[Application ID]
GATSBY_ALGOLIA_SEARCH_KEY=[Search-Only API Key]
*ALGOLIA_INDEX_NAME` is the same as the one we used for the official Algolia plugin for Gatsby.js.
Create a search box
We can use the SearchBox widget.
import React, { useMemo } from "react"
import algoliasearch from "algoliasearch/lite"
import { InstantSearch, SearchBox } from "react-instantsearch"

const Algolia = () => {
  const searchClient = useMemo(
    () =>
      algoliasearch(
        process.env.GATSBY_ALGOLIA_APP_ID,
        process.env.GATSBY_ALGOLIA_SEARCH_KEY
      ),
    []
  )

  return (
    <InstantSearch
      searchClient={searchClient}
      indexName={process.env.ALGOLIA_INDEX_NAME}
    >
      <SearchBox />
    </InstantSearch>
  )
}

export default Algolia
So the Algolia component is ready. You can import this into other components or templates to display a search box.
Create search results part
To display the search results, we can use the Hits widget.
import React, { useMemo } from "react"
import algoliasearch from "algoliasearch/lite"
import { InstantSearch, SearchBox, Hits } from "react-instantsearch"

const Algolia = () => {
  const searchClient = useMemo(
    () =>
      algoliasearch(
        process.env.GATSBY_ALGOLIA_APP_ID,
        process.env.GATSBY_ALGOLIA_SEARCH_KEY
      ),
    []
  )

  const Hit = ({ hit }) => {
    return (
      <Link to={`/blog/${hit.objectID}/`}>
        <article>
          <h1>{hit.title}</h1>
          <p>{hit.excerpt}...</p>
          <ul>{hit.categories.map((category) => <li>{category}</li>)}</ul>
        </article>
      </Link>
    )
  }

  return (
    <InstantSearch
      searchClient={searchClient}
      indexName={process.env.ALGOLIA_INDEX_NAME}
    >
      <SearchBox />
      <Hits hitComponent={Hit} />
    </InstantSearch>
  )
}

export default Algolia
Styling
Now only styling is left. There are two ways to style Algolia widgets;
- Using original css classes
- Adding your own
classNamesorclassNameto widgets, then Style them
Since Algolia has already added its own class names, you can use them for styling.
Or it is also possible to add your own class names by adding classNames``className props to widgets, then style them with CSS modules or Tailwind CSS.
Settings for gatsby-plugin-algolia (before production release)
Skip indexing
To skip indexing, you can set the dryRun: true option (default: false).
{
resolve: `gatsby-plugin-algolia`,
  options: {
    //...
    dryRun: true,
  }
}
Si dryRun : true est défini, le résultat de la construction indiquera que l'indexation a été ignorée.
gatsby build
...
==== THIS IS A DRY RUN ====================
- No records will be pushed to your index
- No settings will be updated on your index
Dans mon cas, je ne mets dryRun : false que lorsque j'ai besoin d'indexation.
Check the limits for your situation and consider when you send indexing to Algolia.
Reference
- Algolia
- gatsby-plugin-algolia | Gatsby
- Adding Search with Algolia | Gatsby *A former library react-instantsearch-dom is adopted in this article but still helpful.